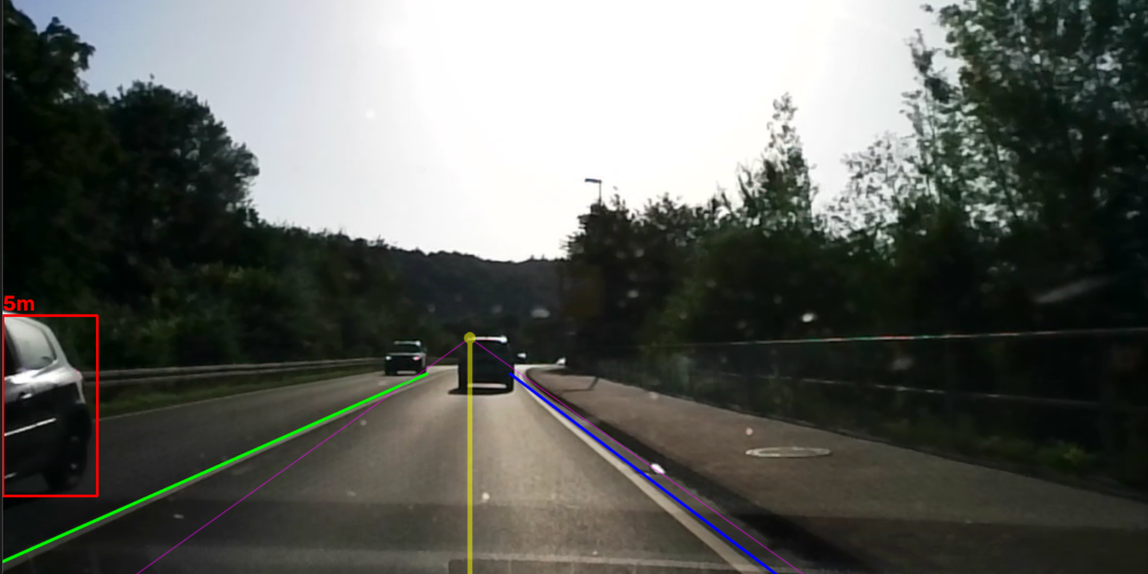
Als Abschlussprojekt für mein C++ Zertifikat habe ich einen Spurhalteassistenten mit Kollisionserkennung entwickelt.
Zur Auswahl für das Praxisprojekt standen eine Bibliothek für Statistiken zu Textdateien und ein kompletter Spurhalteassistent auf Basis einer Stereokamera, inklusive Kalibrierung etc. Wie ich später erfahren habe, war ich erst der zweite Teilnehmer, der sich die CV Aufgabe zugetraut hat und habe sie mit 100% und viel Lob abgeschlossen.
Hier die Projektdokumentation in englischer Sprache (Deutsche Übersetzung in Arbeit):
Project Documentation Lane Detection Project (C++),
Last Edit: 02.11.2026
Motivation:
For the Cpp project module, I chose the alternative project beceause I am on the Visual Computing Engineer track and the usual Cpp project was merely text based. I also have a high interest in learning OpenCV and related algorithms.
Project Enviroment:
The project requested calibrating a Stereo camera which I had to order so I decided to sideline the project and gain some insight into DevOps until the gear arrived. That enabled me to setup a GitLabs Server with some basic settings and using the project as a oportunity for first steps. This lead to using Cmake for build configuration as well as git for versioning.
The project requested using OpenCV and I decided for the newest version 5 which turned out to be only a few days old at that point and with few documentations. Despite that it included new streamlined calibrations workflows and speed improvements in essential areas.
Basic Setup and lane detection:
I started the project with a simple module with a few functions and a main file that would pipe frames from the source video through various processing steps: monochrome, blur, canny edge detection, masking and houghes transform. The houghes transform turns pixels into houghes spaces where points are represented as lines. When a line is present in the image, many pixels on that line – interpreted as points – create a crossing in houghes space which in turn is interpreted as a unique line. Houghes as implemented returns a array of line coordinates.
I initially used footage from the web and the KITTY project with varying results. It quickly turned out that different levels of luminosity and ground defects like cracks and patches on the street were difficult to handle which I first compensated by setting different brightness thresholds in the canny.
Lane filtering
The resulting detected lines contained many false detections and needed a lot of cleanup. I experimented with various coordinate systems or representations. I found that there was a relationship of the slope of lines and the point where they cross the axis(intercept) and this was fixed for lines with the same vantage point. I also created a little visualiser to further explore this. I used this insight to first exclude lines which deviated to much from a horizontal angle. Beceause it became clear that multiple steps would be necessary to clean the detected lines I created a class that would contain the lines as a vector together with flags which could be used to set their side, exclude them or other aspects that would come in handy.
Next I clustered lines that would be close to each other in a slope/axis-crossing mapping. Each line would start in its own cluster and close pairs would be merged. Certain outliers would be filtered out in the process by calculating the mean slope of all clusters and removing all beyond a threshold distance. The remaining clusters would then be merged to their respective center points.
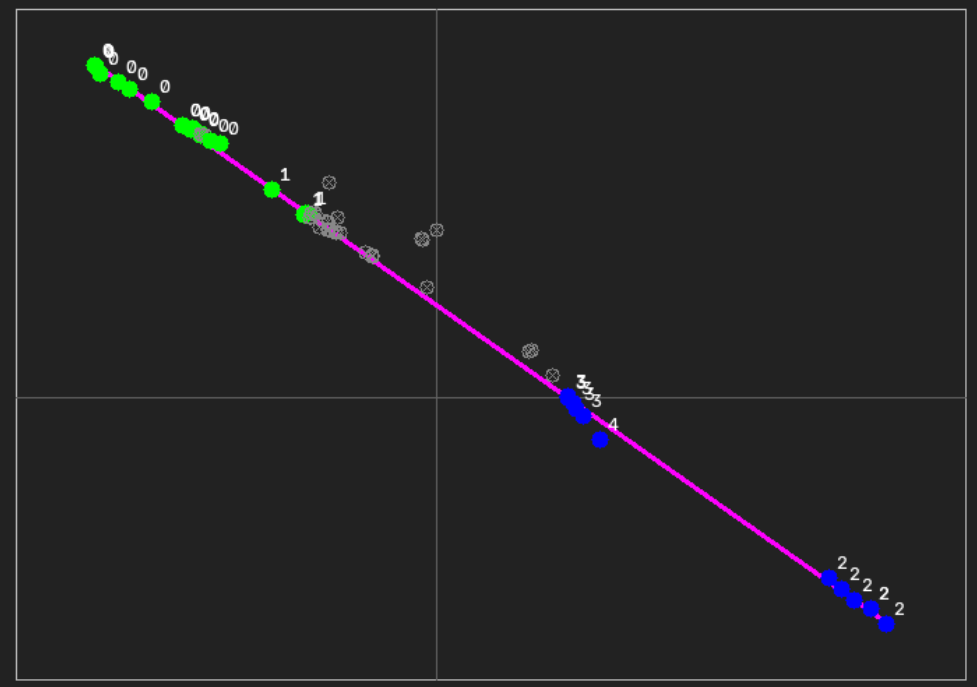
the above image illustrates this with left and right clusters as coloured dots, filtered lines as grey crosshairs and the magenta line as the average slope/intercept relationship. In the image below. the origins of the lines can be seen with outliers coloured in red.
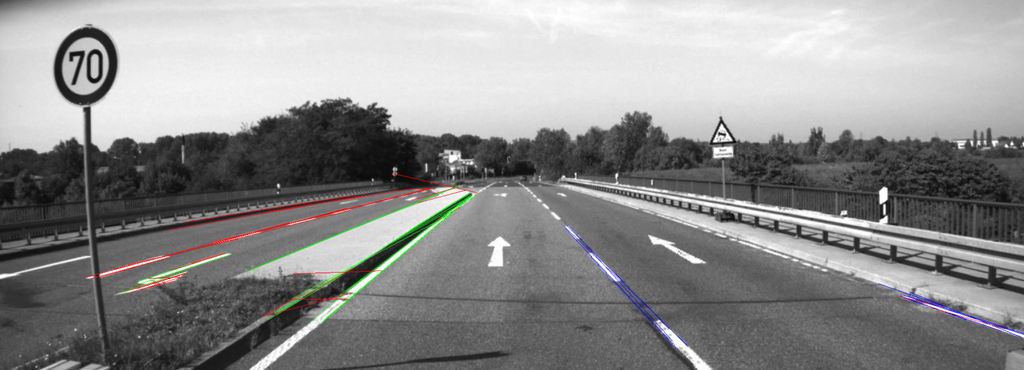
Then I would select the left or right lane from those clusters. A Kaleman filter was introduced to extrapolate the current lane from past results and mixed with the actual detection of a given frame to smooth out detection. I further tweaked the values to get more stable results.
To visualise the result I created a logger that would store each frames results into a file and some code that would show a visualisation at the end of the process.
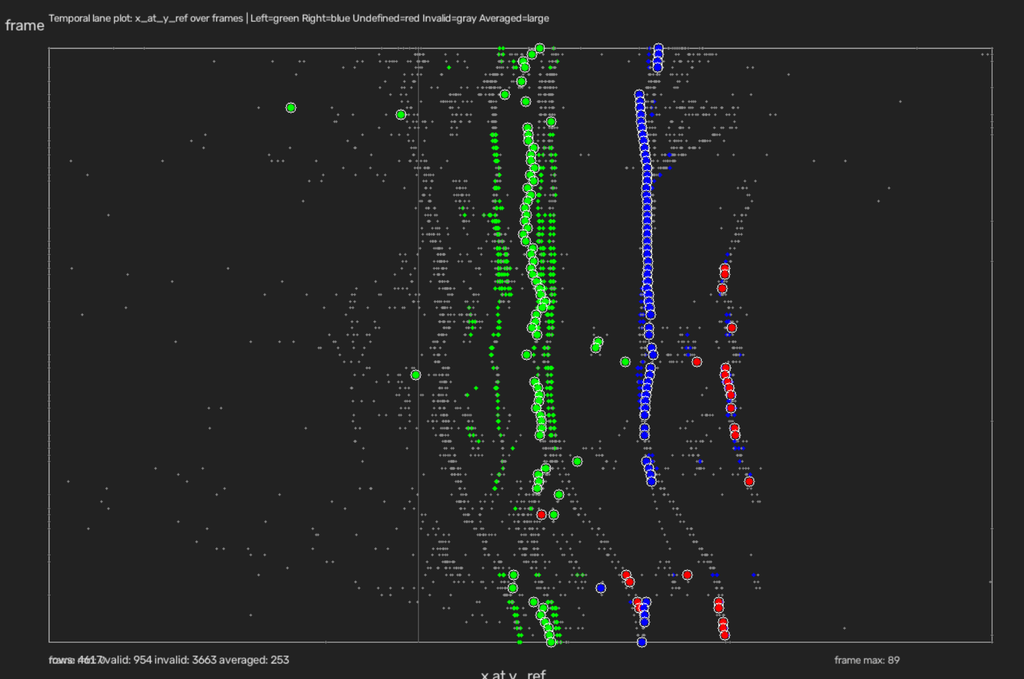
In the image below filtered out lines are drawn as grey dots, showing the vast amount of candidates while small dots are clusters and large dots the final picks for l/r lanes. This is before smoothing as indicated by the jitter and the offset dots.
Temporal smoothing
After filtering with kaleman prediction, we get the version below. While there are still some parts off, this is mostly due to lane changes and interruptions for the left lane but we can clearly see much smoother averages and a tendency to include outliers.
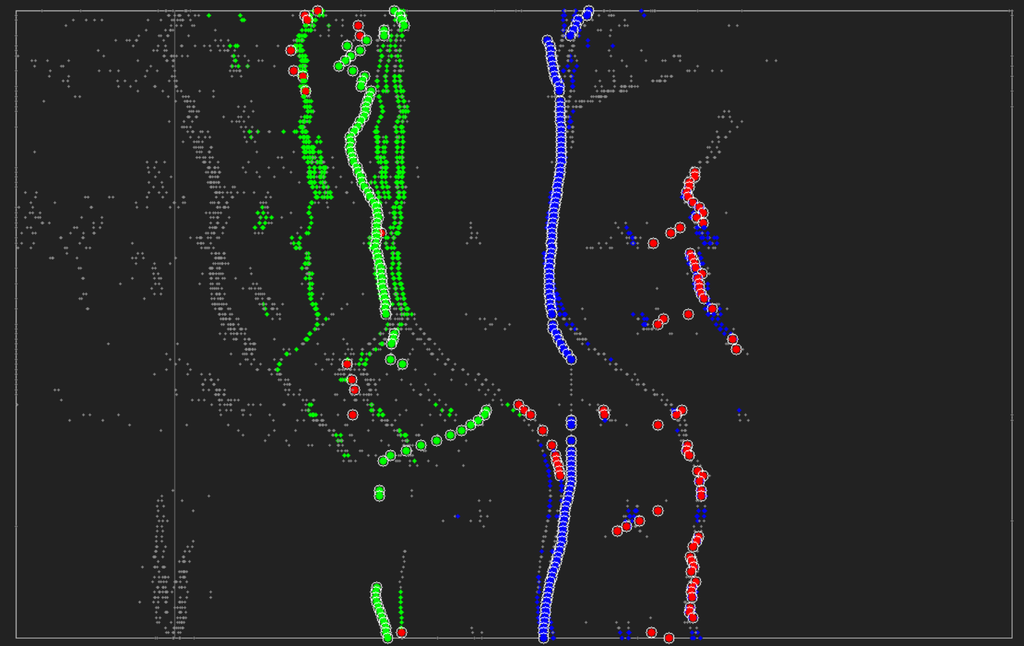
After the initial lane detection was sucessfull, I started testing the execution time of the various functions and adapted the main script to allow multithreading.
While most of the steps could not be executed in parallel beceause they were interdependent, this prepaired for later stages where the lane detection and the stereo processing would be done in parallel.
I optimised the multithread settings for OpenCV to enable the library to use its own multithread optimisation which significantly reduced processing time within image filters.
First stereo disparity tests
Next I started experimenting with disparity image creation unsing the KITTY footage, but the results had high amounts of blotchy noise and were essentially unusable.
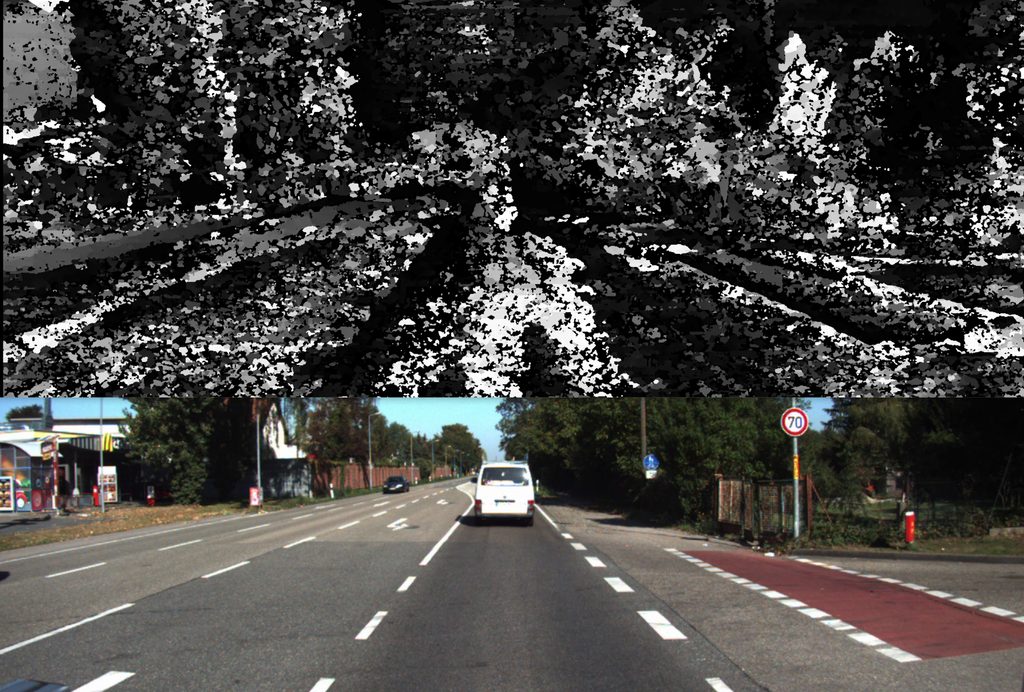
As we can see the footage is extermely speccled and noisy. I therefore discarded any further tests with KITTY.
Stereo Camera & 3D Printed Rig
In the meantime the stereo camera arrived. The Waveshare AR0114 is a stereo camera consisting of two shutter synced cameras on a USB C powered platine. Its advantage is that it has a global shutter which removes rolling shutter. Artifacts like that or unsynced footage would be very hard or impossible to remove within the time scope of this project.
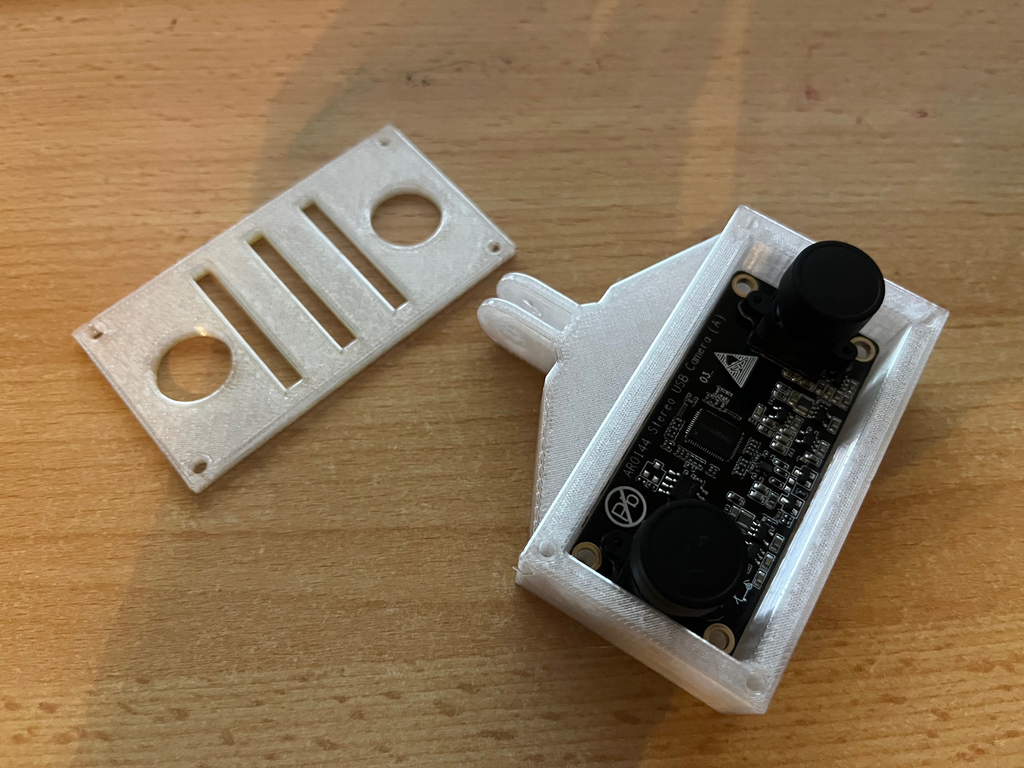
Unfortunately being a lowbudget solution, it did not come with a case. Therefore I 3D modeled a case and printed it with a Bambulab A1 3D printer in PLA.
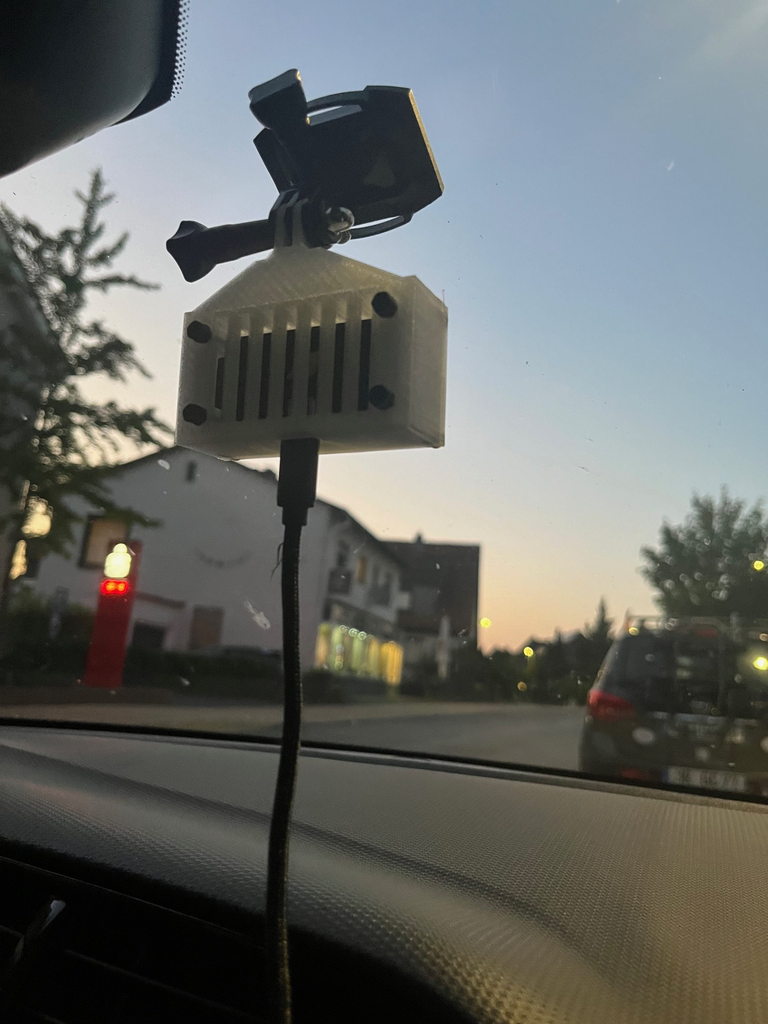
After a few tests it showed that overheating became a issue. I measured platine temperature with a Type J thermo resistance sensor and a Multimeter. Temperature exceeded PLA tolerance above which the material softens. Also on the day scheduled for the final recording, outside temperature was projected to reach 40°C. I therefore added better ventilation and switched to PETG as material which is more heat resistant. I adapted it to a GoPro-type rig to be able to attach it to the windshield.
(Image below: Camera attached to the windshield and open case in assembly.)
Stereo Calibration
I created a calibration profile for the camera with a Charuco Pattern on a plywood board. Charuco has the advantage that its exact angle can be detected while a chessboard pattern is the same in 90° angles.
I then recorded several images with various board distances but the generated calibration was slightly off. I measured the boards squares and found out that my printer driver slightly rescales images that are full A4 format instead of cropping them. (29.2 instead of 30 mm). This indicates that detailed knowledge of the techniques and thorough verification is necessary to avoid problems down the pipeline.
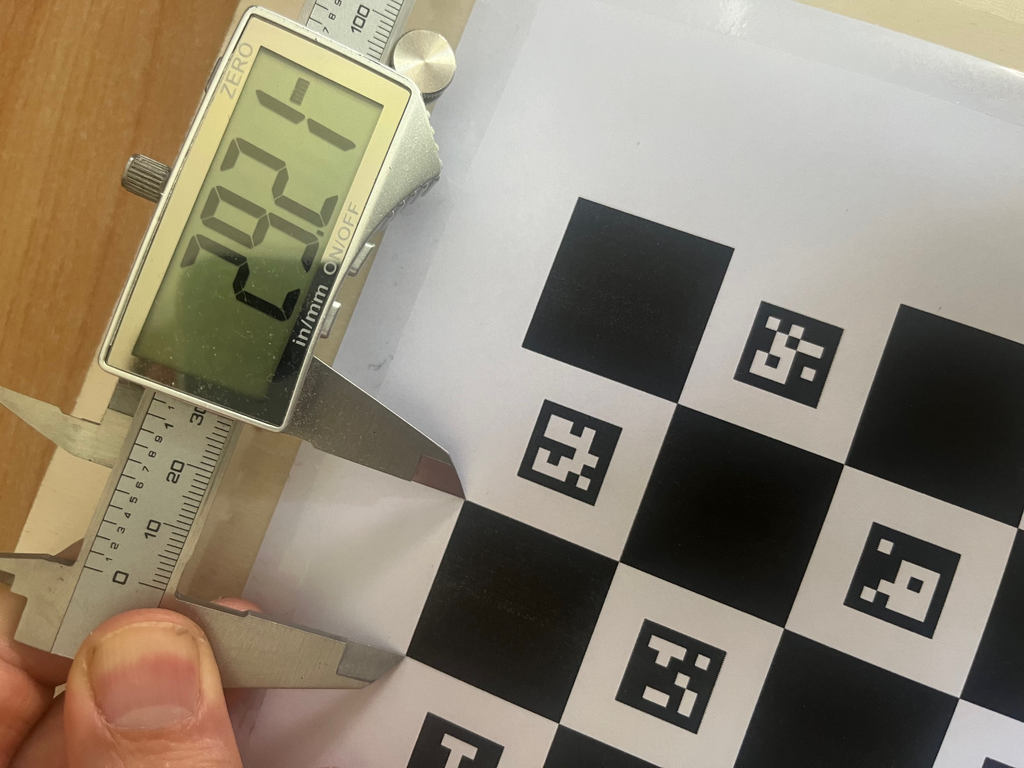
After adapting the calibration settings to the deviation, I was able to create a proper calibration file.
First tests with various disparity map creation algorithms in OpenCV showed promising results.
Following the example of the lane detection pipeline, I wrapped the algorithms into a pipeline build for stereo processing. I have to note that while calibration compensates lense distortions and rectifies the image as well as giving more finetuned details on the camera, it does not calibrate depth estimation in the later Depthmap. This would need further distance calibration.
Stereo Depth Pipeline
I rented a car and recorded various settings at day and at nighttime. Unfortunately within the recording timeframe there was no rain and there was no budget for a second rental. Therefore testing with those conditions will be subject of future improvement. A description of the test footage is attached to this documentation. I then started experimenting with the pipeline. The idea behind the pipeline approach was inspired by decades of using nodebased systems like Shake, Houdini or Nuke. In those systems the In and Outs of processing functions are piped together visually allowing it to quickly prototype data flows and functions.
While not being a full nodebased system, the basic setup is this: Every processing function is wrapped into a class. That class is a child class of a base class from which it inherits a comon set of methods. As a analogy I like to call them nodes.
Every instance of those nodes is stored in a container. A pipeline object then passes the input images (left/right) to those nodes and hands over the result to the next node in line. The images are stored in their own class together with a list of flags. Those flags store propertys of the nodes like channels or type (depthmap, disparity map, blured etc.). Other nodes can use this as conditions for execution. Beceause the system is designed to foster sandboxing, this can be used to check if a processing setup is dysfunctional and violates necessitys. Due to the necessitys of the given timeframe this was disabled with a toggle, but is still integrated for future use. Performance testing has also been integrated into the pipeline system.
The pipeline idea proved to massively speed up testing. Originally I intended to build the final solution into more of a integrated monolith but the overhead of the system was minimal in comparison to the gains so I sticked to the pipeline setup.
DepthMap Creation
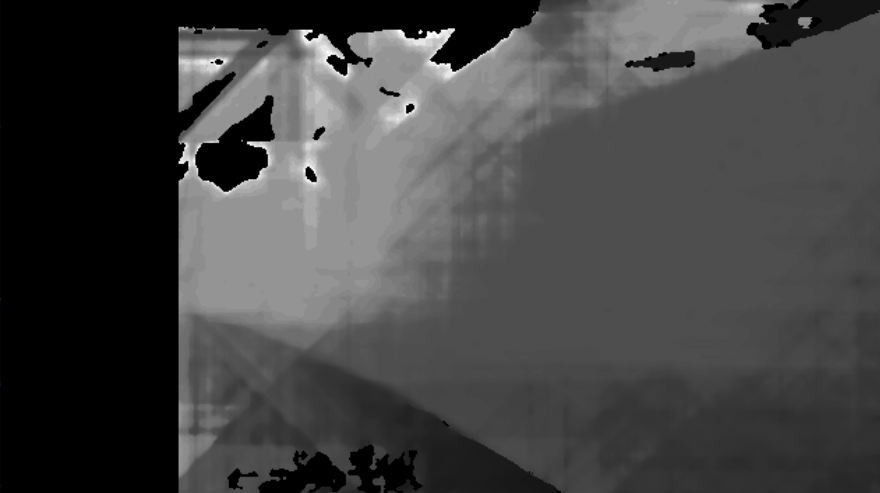
I was able to create decent disparity maps with my test footage using the SBGM Method which showed that my calibration was accurate. In the image below you can see that most of the street and the wall to the left are covered by the detection. The black part to the left is due to a high disparity setting I later optimised.
I first found it difficult to find a good obstacle detection method. My initial idea was to create a point cloud from the disparity map and use 3D Calculations to detect those obstacles. I discarded the idea beceause the degree of noise and the processing load were to intense. Instead I used a UMap. This is a representation of a depthmap as a top view histogram. It works through accumulating intensitys or luminance for every point with a certain distance.
Disparity maps map the distance of a point between the two cameras. Beceause the distance is zero for far objects and increases closer to the camera, in our setting distance rarely exceeded 0 and had a inverse relationship. Farther objects were closer together while closer objects had more spreadout values. That bias proved a disadvantage in this case so I did not use the Umap from disparity.
I converted the disparity map into a Depthmap using the camera specific values (focal length etc).
This gave me a map where each pixel would represent its distance from the camera. The propertys of the depthmap were that pixel values were linear to distance. I created a Umap from the this Depthmap. Beceause the input was non linear, the resolution decreased futher from the camera and showed distinct lines due to quantisation. Beceause of this and some degree of noise, I experimented with various averaging methods and ended up with a algorithm that would blockwise accumulate and average pixels. This map would then be thresholded to exclude noise.
Using a Detection_Algorithm from OpenCV I would detect bounding boxes for various connected regions that could also close small gaps. This would be filtered for a certain distance range.
This would give me the horizontal extend of obstacles as well as their distance to the camera. To also get the vertical positions of the Bbox, I used a Vmap representation which is similar to the Umap just from the side view. For every bounding box I restricted the Vmap to exclude overlaps with other objects from the side view. This enabled me to calculate obstacle bounding boxes and also plot them into the main view. Before that I would filter them by size to exclude any noise.
Below are various displays and intermediates of the obstacle detection. Vmap is not displayed beceause it is evaluated per obstacle and thus difficult to screenshot.
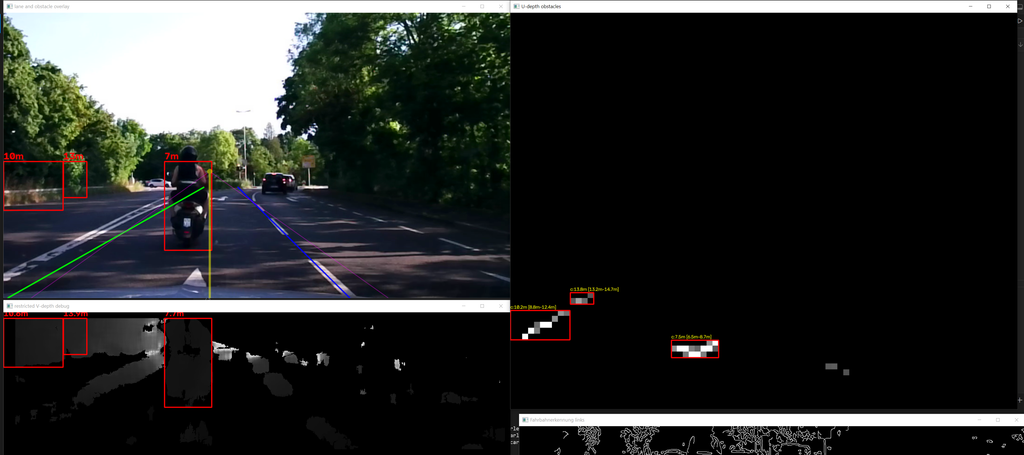
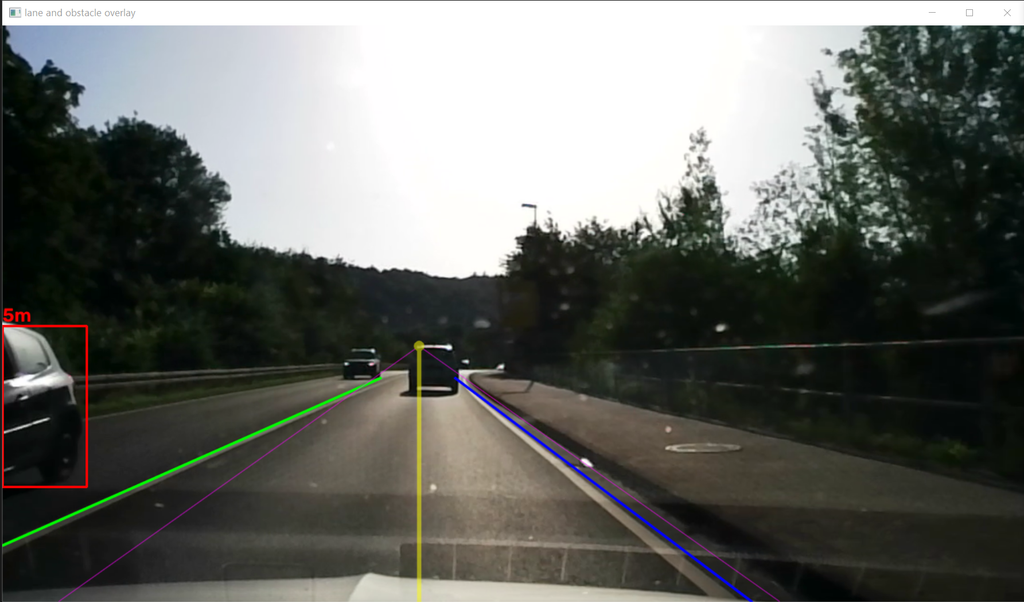
The image above shows the final detection view. Green: left lane, blue: right lane, yellow: car trajectory with perpective vantage point, violet: camera vantage lines. Red boxes: object detection.
Performance optimisation
After the basic lane and obstacle detection I tested the function and measured the execution times.
RESULTS:
- Frame loading: 5231 microseconds
- Image rectification: 2405 microseconds
- Left Lane Preprocessing: 5250 microseconds
- Pipeline UDepth – Node 0: 3328 microseconds
- Pipeline UDepth – Node 1: 77622 microseconds StereoSgbmDisparity
- Pipeline UDepth – Node 2: 6364 microseconds SpeckleFilter
- Pipeline UDepth – Node 3: 5483 microseconds DisparityToDepth
- Pipeline UDepth – Node 4: 16081 microseconds UDepthHistogramNode
- Pipeline UDepth – Node 5: 6655 microseconds HistogramPrevPrep
- Pipeline UDepth – Node 6: 8978 microseconds BlockAvg
- Pipeline UDepth – Node 7: 6229 microseconds HistogramPrevPrep
- Depth Map Preprocessing: 135497 microseconds
- Obstacle Detection: 4949 microseconds
- Pipeline VDepth – Node 0: 1546 microseconds
- Pipeline VDepth – Node 1: 72923 microseconds
- Pipeline VDepth – Node 2: 6707 microseconds
- Pipeline VDepth – Node 3: 5488 microseconds
- Obstacle V-Refinement: 113876 microseconds
- Displaying: 10487 microseconds
- Entire Frame duration: 275467 microseconds
At a asumed framerate of 25 fps, a frame should be processed around 40.000 microseconds for realtime usage.
I improved the efficiency by futher tweaking the OpenCV settings, better direction and usage of multithreading and cropping of unnecessary image parts. I also merged the Umap generation with averaging into a script without intermediates increasing efficiency more than 4fold for that part.
I then switched from SBDM to DM method. This reduced quality but cut rendertime by more than 75 %.
After improvements processing time was down to around 45.000 ms approaching realtime. This is a 83% reduction.
- Frame loading: 2876 microseconds
- Image rectification: 2188 microseconds
- Pipeline Depth – Node 1: 448 microseconds
- Left Lane Detection: 6831 microseconds
- Pipeline Depth – Node 2: 6687 microseconds
- Pipeline Depth – Node 3: 2583 microseconds
- Pipeline UDepth – Node 0: 2395 microseconds
- Depth Map Preprocessing: 16156 microseconds
- Obstacle Detection: 4652 microseconds
- Obstacle V-Refinement: 2051 microseconds
- Displaying: 11055 microseconds
- Entire Frame duration: 44891 microseconds
- Frame loading: 2876 microseconds
- Image rectification: 2188 microseconds
- Pipeline Depth – Node 1: 448 microseconds
- Left Lane Detection: 6831 microseconds
- Pipeline Depth – Node 2: 6687 microseconds
- Pipeline Depth – Node 3: 2583 microseconds
- Pipeline UDepth – Node 0: 2395 microseconds
- Depth Map Preprocessing: 16156 microseconds
- Obstacle Detection: 4652 microseconds
- Obstacle V-Refinement: 2051 microseconds
- Displaying: 11055 microseconds
- Entire Frame duration: 44891 microseconds
I then further cleaned and documented the code, edited the test footage to extract the most insightfull test scenes and performed some further testings.
Lane change detection
Lane change detection was implemented by first showing the cars trajectory based on the cameras vantage point in the viewer. The I implemented code that calculates the intersection between the lanes and the cars middle trajectory. A threshold would flash a warning if that point was close enough to the car to indicate imminent crossing of the lane.
Tests on different hardwares
The software was tested on two different machines:
- Workstation with AMD Ryzen 9 12-core, 64 GB RAM, Windows 10
- Laptop with Intel i5-1135G7 4-core, 16 GB RAM, Windows 11
On both machines performance peaked close to realtime.
Overal Project process and accomplishments
The Project had several explicit and implicit goals. On a functional level its purpose was as described by the project brief to create a working software with lane and obstacle detection and other features.
On a meta level, it was a study project supposed to deepen learning and demonstrate knowlege and skills in the field. As such it was taken with a degree of courage and experimentation that might not have been straight forward towards the project goal or helpfull with the projects timeline. But this forced me to spend a lot of time reflecting on the general software design and data flow. There were parts where I moved to fast and actually did created pretty bloated code. I think this is a good and humbling experience beceause it showed me how challanging it is to jump from those high level perspectives with modular IO Perpectives into the actuall code details. Especially beceause my first CPP code was just 6 weeks before the project start. This gives me a learning path both in OOP and software design as well as the details in code that are not yet in my bloodstream. Good class hierarchy routines, multithreading and exceptions handling that workes more like a gatekeeper where exceptions really happen and stays out of routine details that wont change once they get proper data.
My next project will also start with UML diagrams and data flow maps.
On the functional level, I was able to get some decent results for most of the situations but not continously. The canny-houghes approach only gets one to a certain degree and the next step would be to include a luminance based verification and some colour localisation to balance out the variation in luminance. This would really make thresholds stick. Also compensating perspectiv and projecting into a top view would be usefull.
The anticipation of lane crossing is a simple trick due to time constraints but it works if lane detection is good enough. A more solid approach would be to also detect the vehicles velocity relative to the lanes and verify a crossing with that.
In general the given approach only works with straight lanes and a sliding window approach would be worth a try for curved lanes.
Working on depth detection was very inspiring beceause the Udepth and Vdepth Maps are concepts that can be very versatile for future work in the fields not only for usage in cars. The results were generally good dependent on the quality of the disparity creation. There are ML based approaches outside the scope of OpenCV that could provide a speed and quality gain.
Larger Obstacles on the road were generally detected well with more false positives in situations with high texture frequency and amplitude. It can be expected that obstacles that are flat on the road or have a curved surface will be detected with less accuracy beceause depth values accumulate in surfaces vertical to the camera.
Overall I would determine the project a success given the timeframe and my status as a Newbie in Cpp.
It is a classical perfectionist trap, inviting to never stop improving. Being forced to stop at some point and handing it out as it, is another valuable lesson.
Overview Testing Footage
(as recorded for the project)
Video: Test 01
Time: Daytime, clear sky
location: main road to motorway
description: broad main road, strong lane markings,
high constrast well lit road. Camera flickering (changing auto-exposure)
lane change. Motor way part: strong side lanes, interupted middle lane (left).
Test Results: lane detection is clean for the first straight part. It becomes unprecise around the lane change which is detected but not as imminent due to flickering detection. In the curve, lane detection becomes erratic because it isnt build for curved lanes. In the first tests lanes took long to catch up once a straight lane was there beceause of the smoother. Tweaking the values made this much faster while keeping smootheness. On the motorway, left lane is interupted and only periodically recognised. This could be solved by projecting the lanes into a top view in the future beceause the gap closing calculations are not perspecive compensated yet.
Obtacle detection is good for passing cars but has false positives due to high noise on the Depthmap close to the car.
This is beceause of strong contrast and reflective road. This leads to high frequency texture typical for low lit rough surfaces and can trigger false values. This seems only solvable with more expensive algorithms.
Video: Test 02
Time: Daytime, clear sky
location: urban street
description: curvy village street, faded middle markings,
strong building shadows on the road. few traffic
The right side of the road is typically recognised well, while the left side jumps to othe road markings and within shadows the faint markings are sometimes not registered. In those situations the left lane moves to the side of the road but gradually due to the smoother. Obstacles on the side are recognised, mostly objects that are facing the camera as intended. Sometimes the curb is also recognised if its high enough.
Video: Test 03
Time: Daytime, clear sky
location: urban side street
description: side road with parked multiple cars.
turns next to obstacles. no lanes
In this scene, objects at the side of the road are properly recognised. The Bounding box does not always detect the full objects due to the DepthMap Quality but in general all objects are detected. It shouws however, that the calculated depth is off. Beceause of the lense distortion, rectification and other porpertys, there is a uneven dirstribution of depth in the image and a measured distance calibration would be necessary, which was outside the given timescope of this project, considering it had to be created after only a few weeks of Cpp experience.
Lane detection is off, since there were no lanes. With the many objets at the road side, detection of the side of the road was also impossible.
Video: Test 04
Time: Daytime, clear sky
location: motorway
description: motorway, strong right lane, interupted middle lane (left) with lane change at the end.
Good lane detection but interupted for the middle lane as in 1. The lane change is detected but not close enough to trigger the warning (maybe further tweaking parameters will be necessary)
Video: Test 05
Time: Daytime, clear sky
location: City
description: car drives next to a bridge, strong shadows, approaches multiple obstacles at traffic light.
Lane detection catches up quickly after a curve but is distracted by long sharp shadows. Obstacle detection catches cars and motorbike on a traffic stop. The shadows problem could be solved by implementing a algorithm that only considers lines which are brighter than the sourrounding.
Video: Test 06
Time: Daytime, clear sky
location: City
description: broad road, multiple lanes, lots of organic shadows. Stops at traffic light with obstacles.
Good lane detection with some interruptions but detection quality degrades near a shaded traffic light. A motorbike is properly detected when closer to the car. At a distance of 12-14 meters (in uncalibrated measurement) the detection degrades.
Video: Test 07
Time: Daytime, clear sky
location: City
description: broad road, multiple splitting lanes, lots of straight shadows. Stops at traffic light.
Lane detection often catches cracks in the road or other markings like arrows if no clean lane is present. Right lane shows much better performance for the road side, catching eighter markings or the curb. Obstacle detection is good but gives false positives for the same reason as in Test_01.
Video: Test 08
Time: Nighttime
location: City
description: curvy village street, faded middle markings, streetlights
much worse detection than previous Tests. Left lane sometimes jumps to side of the road despite markings. Right lane fails to detect side of the road. Canny is clear, just a bit noise so the reason need further investigation.
Video: Test 09
Time: Nighttime
location: City
description: Main road, good markings, many lanes and bicycle lanes, Strong streetlights, strong light halos, lense and windshield reflections.
Lanes are recognised on average but with deviations for the left lane where gaps are much bigger. Obstacle detection for a car at the traffic light catches very late. Reason might be high noise and the strong light bleed of the cars rear brake lights.
Video: Test 10
Time: Nighttime
location: Landside
description: Land road, no Streetlights, fading side markings, lane change at the end.
Strong detection for the bad light condition. Left and right lane are almost continously detected with some deviation of the left lane at multiple markings. With turn at a crossing, lane detection is turning bad and no lanes are detected. Therefore lane change is also not detected.